NextGet the full student namelist before scanning so Class + Index can resolve immediately.
STEP 2
Get the full student namelist
Load the authorised school roster from FlexiList so scanned Class + Index resolves to names, form classes and Teaching Groups.
No namelist loaded
Get the full student namelist from SCMobile
1
Create / replace the bookmark onceIf you previously saved GNOME Namelist, delete or replace that old bookmark first — browser bookmarks do not update automatically. Then show Chrome's bookmarks bar (Ctrl + Shift + B) and drag this onto it:SCMobile All Namesdrag to bookmarks bar
2
Open SCMobile and run your bookmarkOpen SCMobile and sign in normally with MIMS/MFA. You do not need to open FlexiList first. Once you are inside SCMobile, click the SCMobile All Names bookmark you just made. It downloads the full Name, Class, Index and Teaching Group list.Open SCMobile
3
Load the namelist into GNOMEChoose the downloaded SCMobile All Names YYYY.csv. It is read locally in this browser.
No namelist loaded
Already have a FlexiList Excel workbook?
GNOME can also read an existing FlexiList .xlsx locally. Teaching Groups are available only if those columns exist in that workbook.
Choose the expected cohort
After loading all student names, click to select which class or Teaching Group you are expecting answers from.
No expected cohort selected
Local processing
Roster files stay in this browser. The SCMobile All Names bookmark runs only inside your authenticated SCMobile tab and uses read-only same-origin FlexiList GETs.
LOCAL
BEFORE YOU SCAN
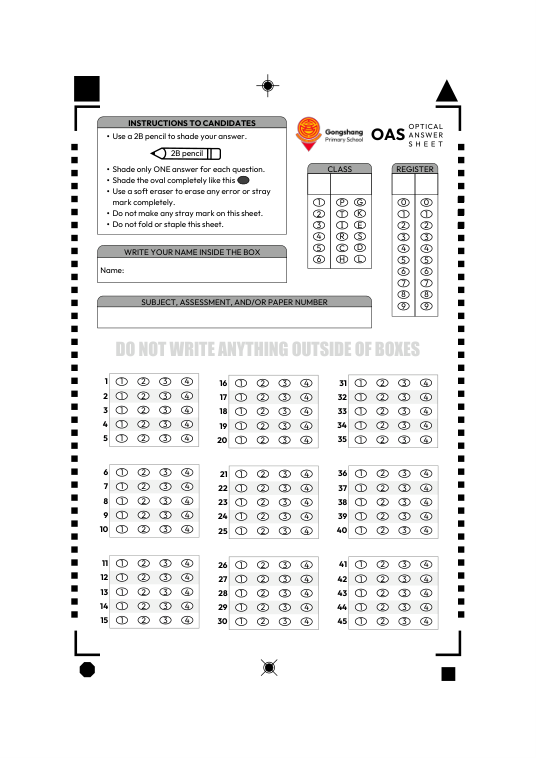
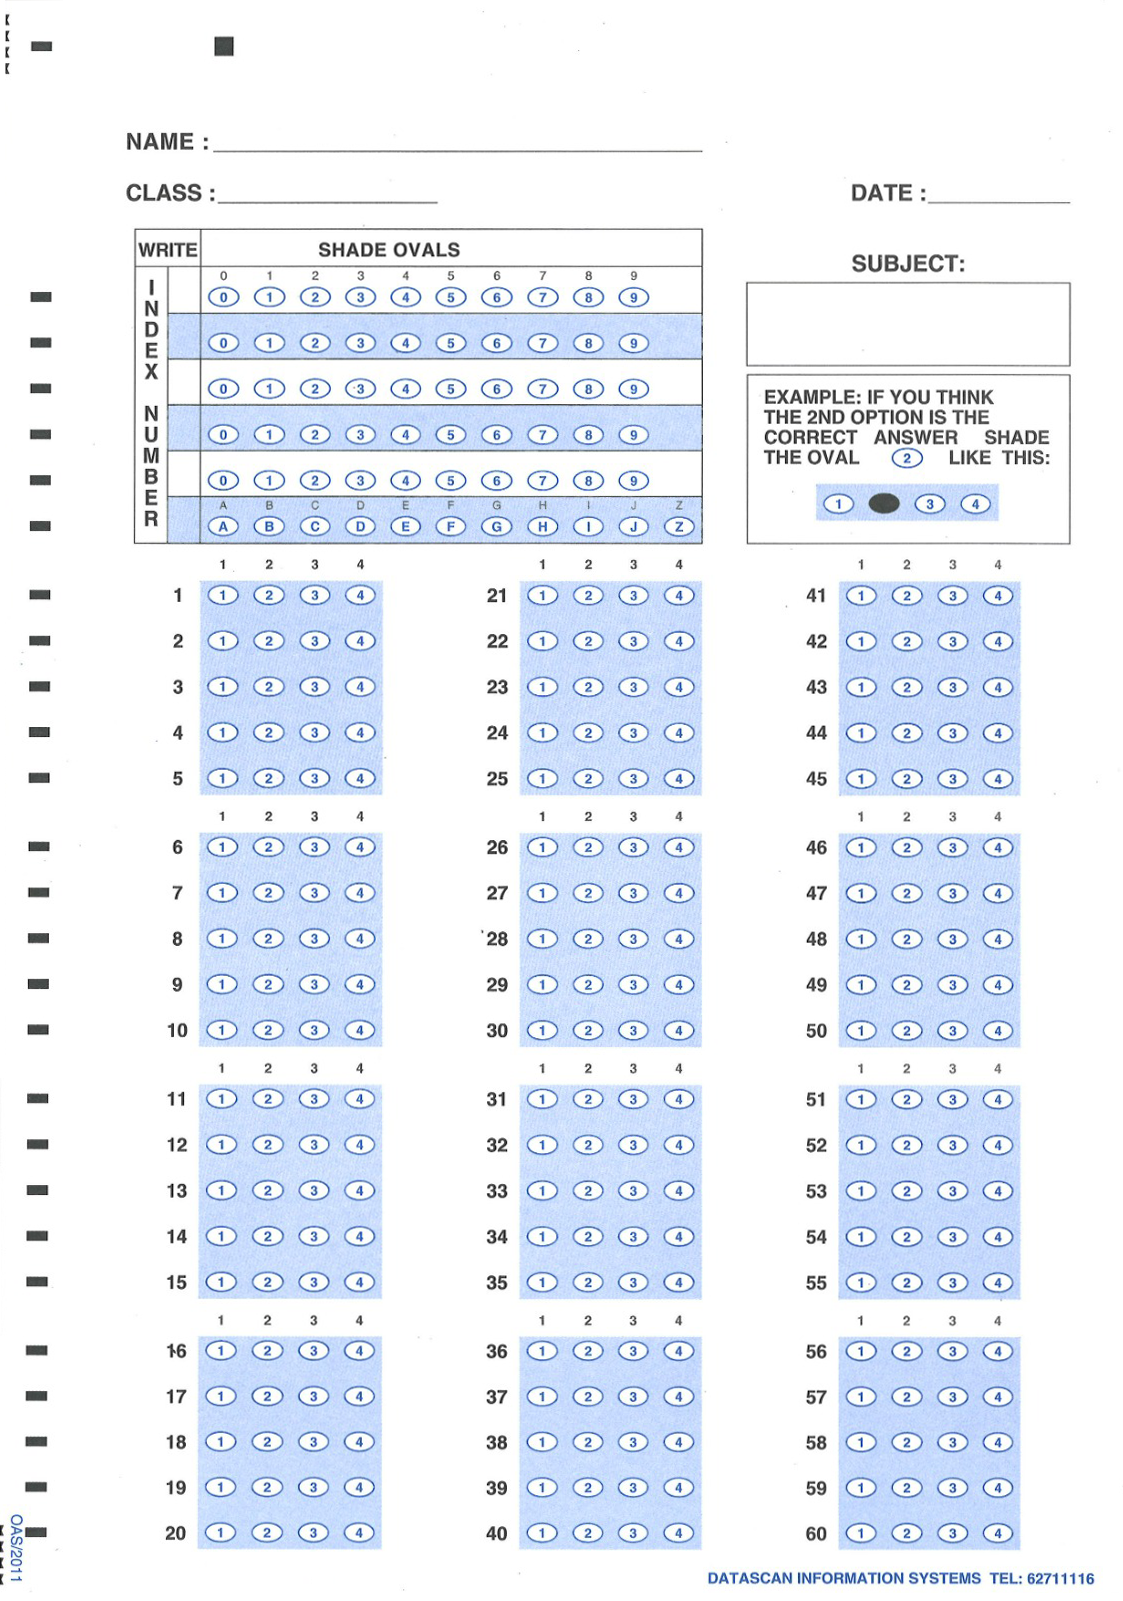
Which OMR sheet are you using?
Match your printed answer sheet to one of the examples below.
STEP 3A
Scan New
Scan the GNOME OAS in greyscale on the Canon feeder, classify every generated PDF with Microsoft Purview, then load all PDF chunks together.
No batch loaded
Temporary legacy support.Scan Old exists only to grandfather the previous OMR form while staff transition to the GNOME OAS. New assessments should use Scan New.
OLD OMR WORKFLOW
Scan old forms by class when you need student identity
For student matching, scan one class at a time. GNOME reads only the first two shaded INDEX NUMBER digits; in Review, select multiple scripts and apply that class to them.
If you only need cohort-level Fi-Di analysis, you may scan a mixed cohort and leave individual identity unassigned.
Use Grayscale for this form too; follow the illustrated steps below.
SCAN ON THE CANON
Scan the GNOME OAS response stack
Scan in greyscale
Follow these steps for both new and old response sheets. Click any photo to enlarge it.
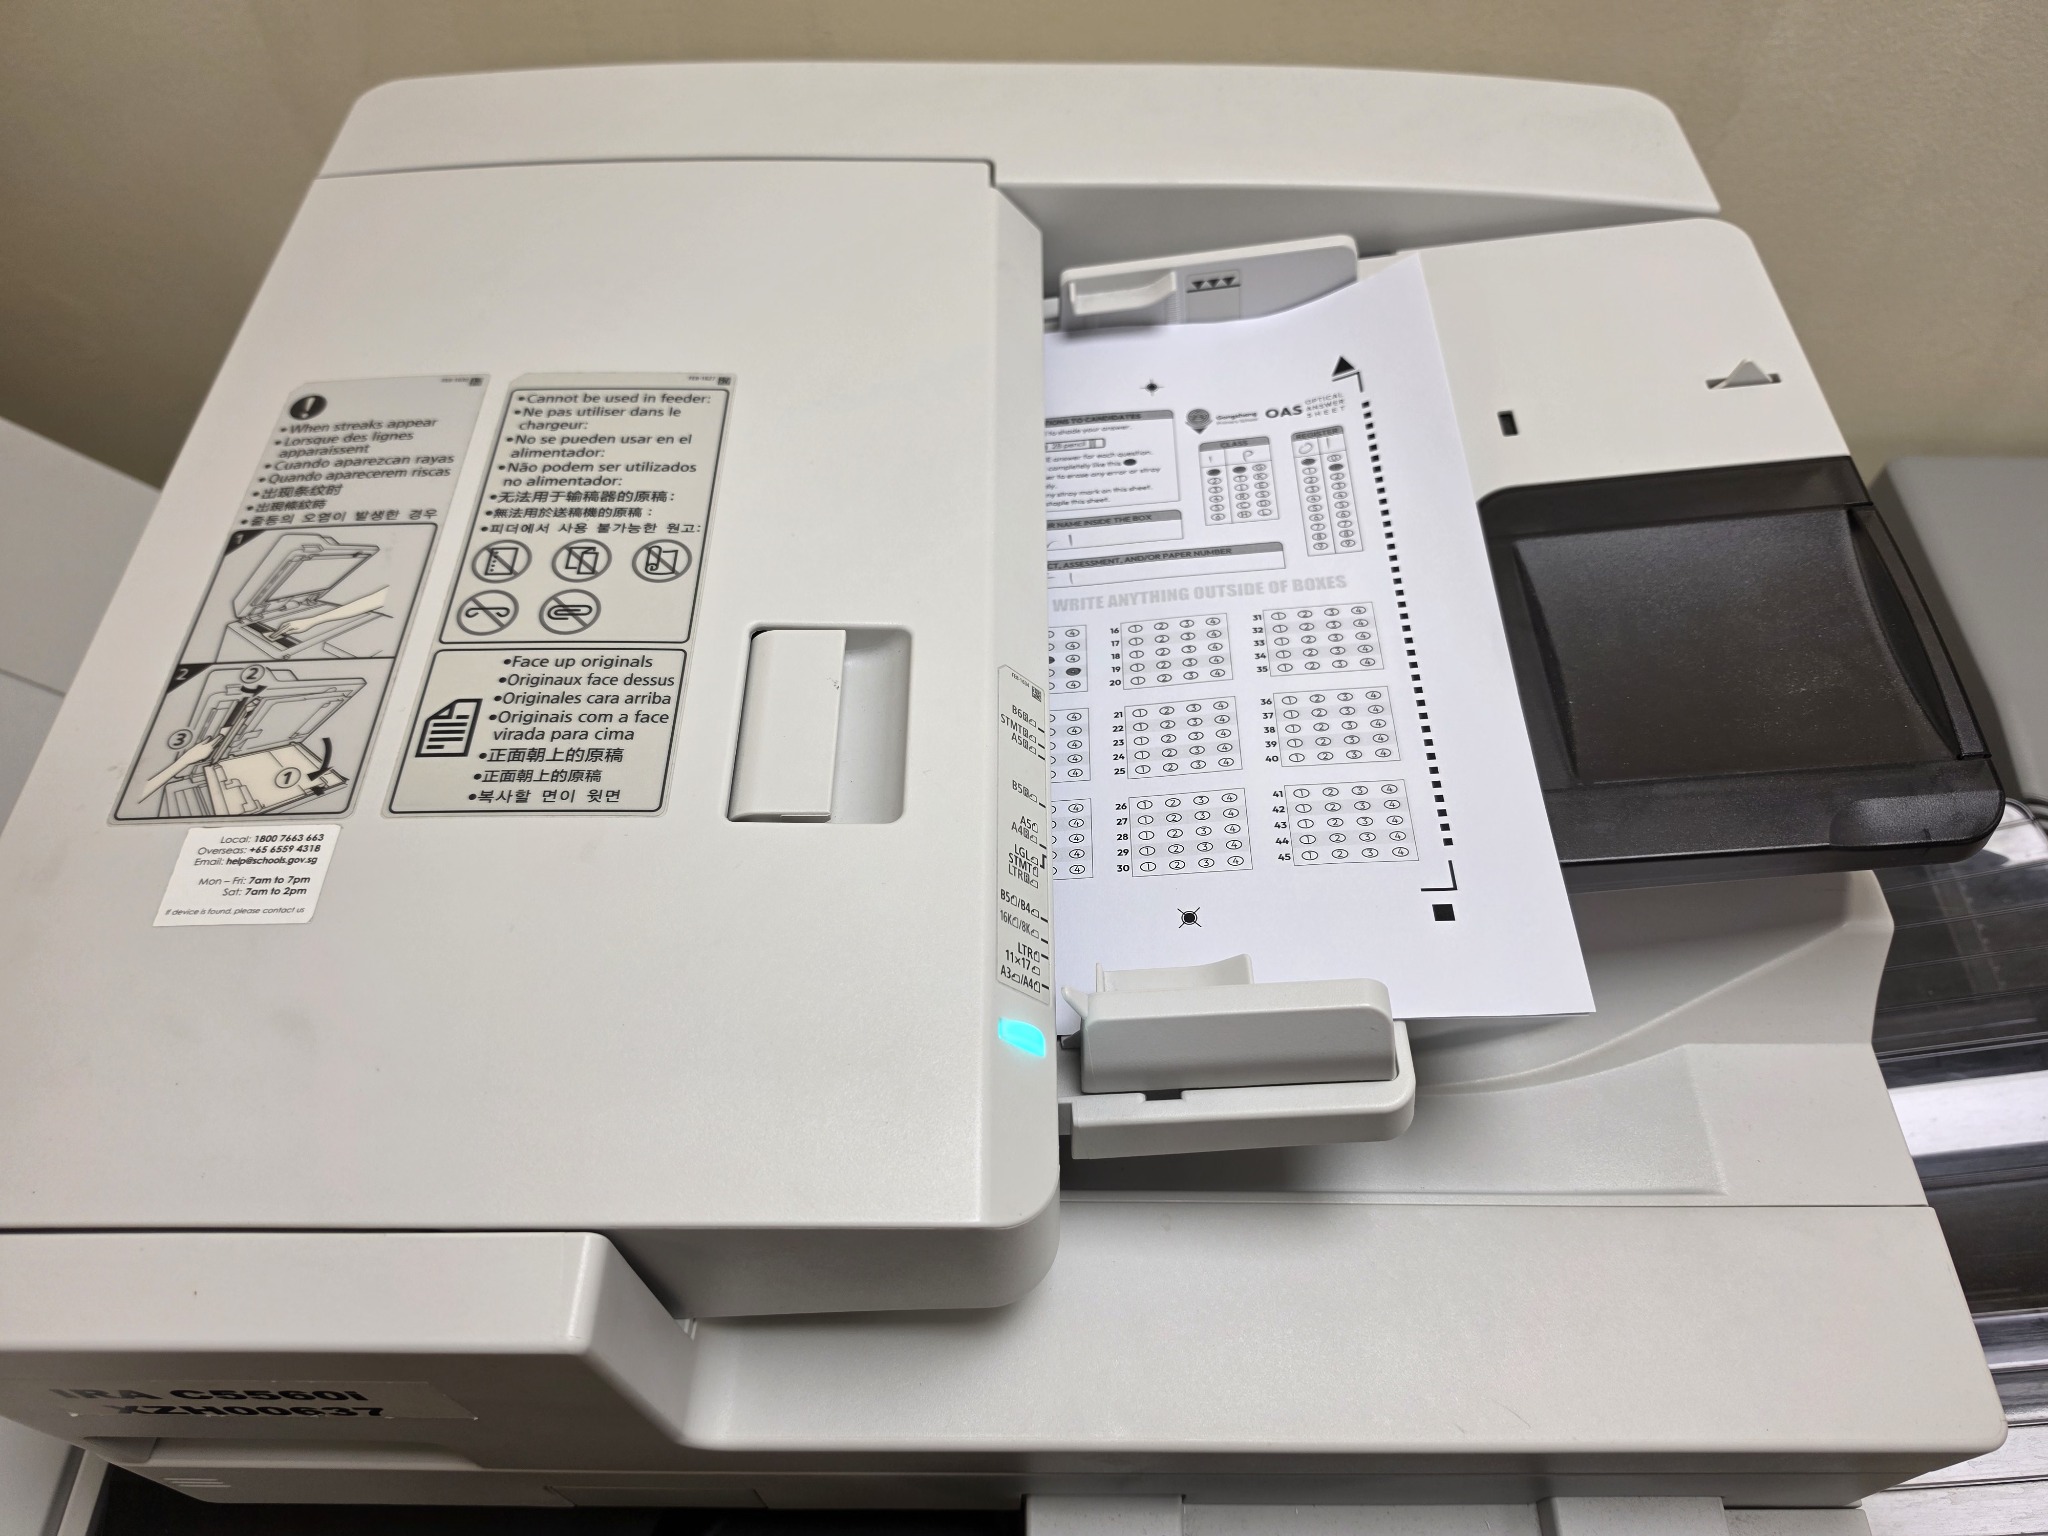
1Load the ADF
With the scan-bed down, place the response sheets face up in the automatic document feeder (ADF), as shown. Adjust the paper guides to the stack.
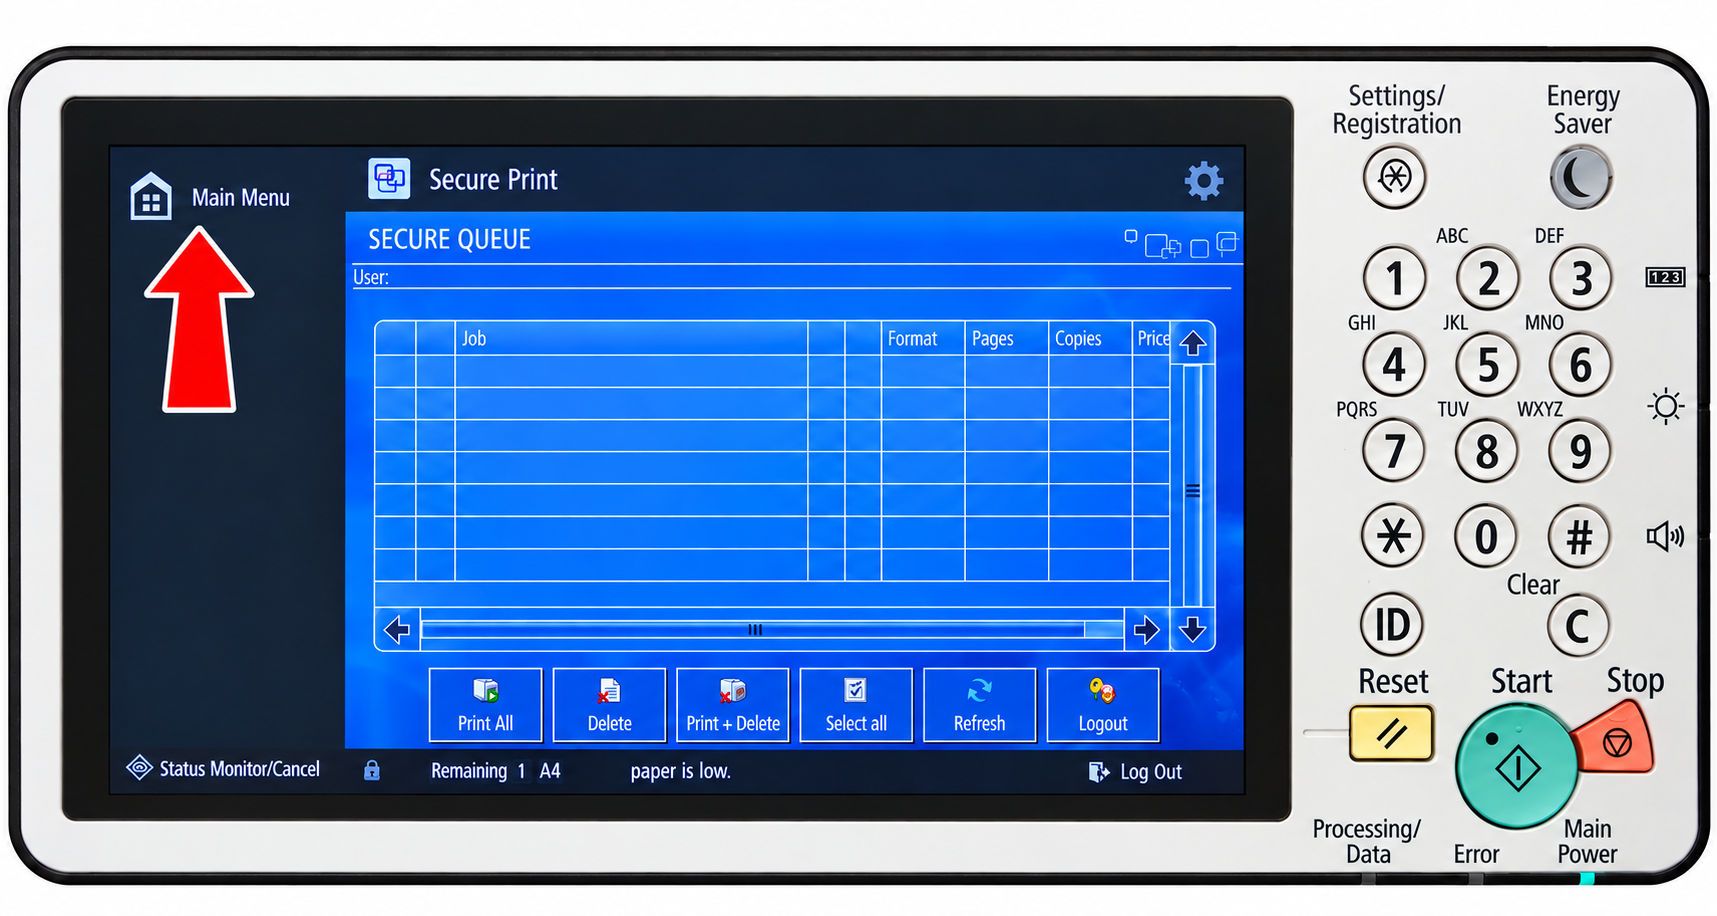
2Open Main Menu
Log into the Canon printer, then select Main Menu at the top left of the screen.
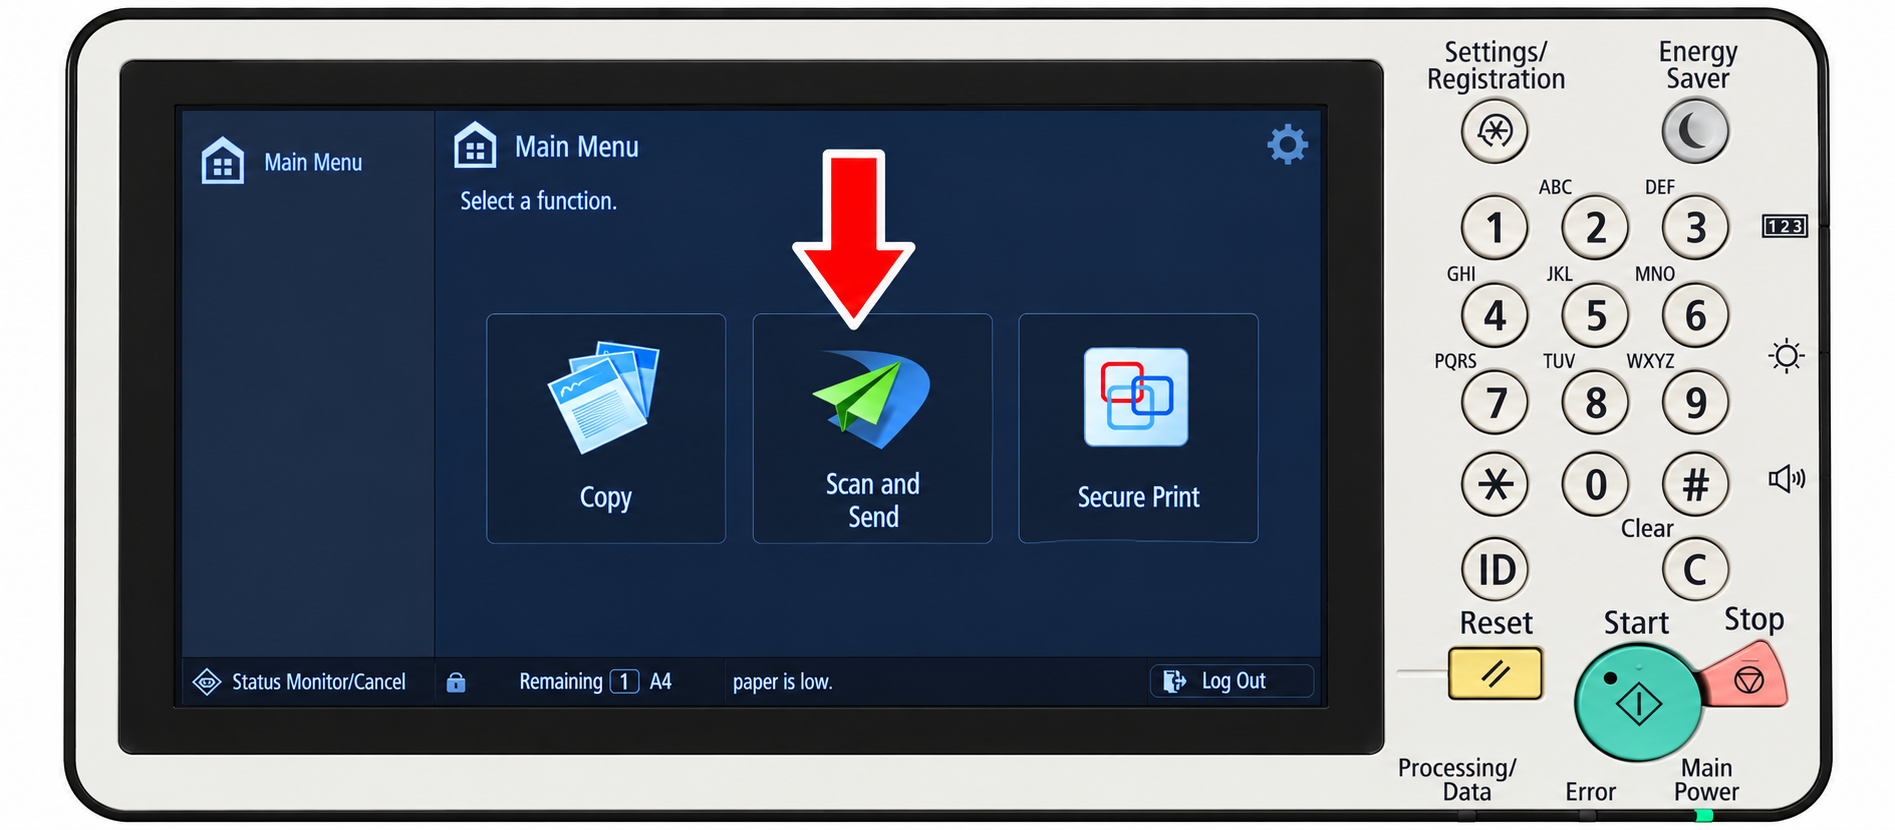
3Open Scan and Send
In Main Menu, select Scan and Send.
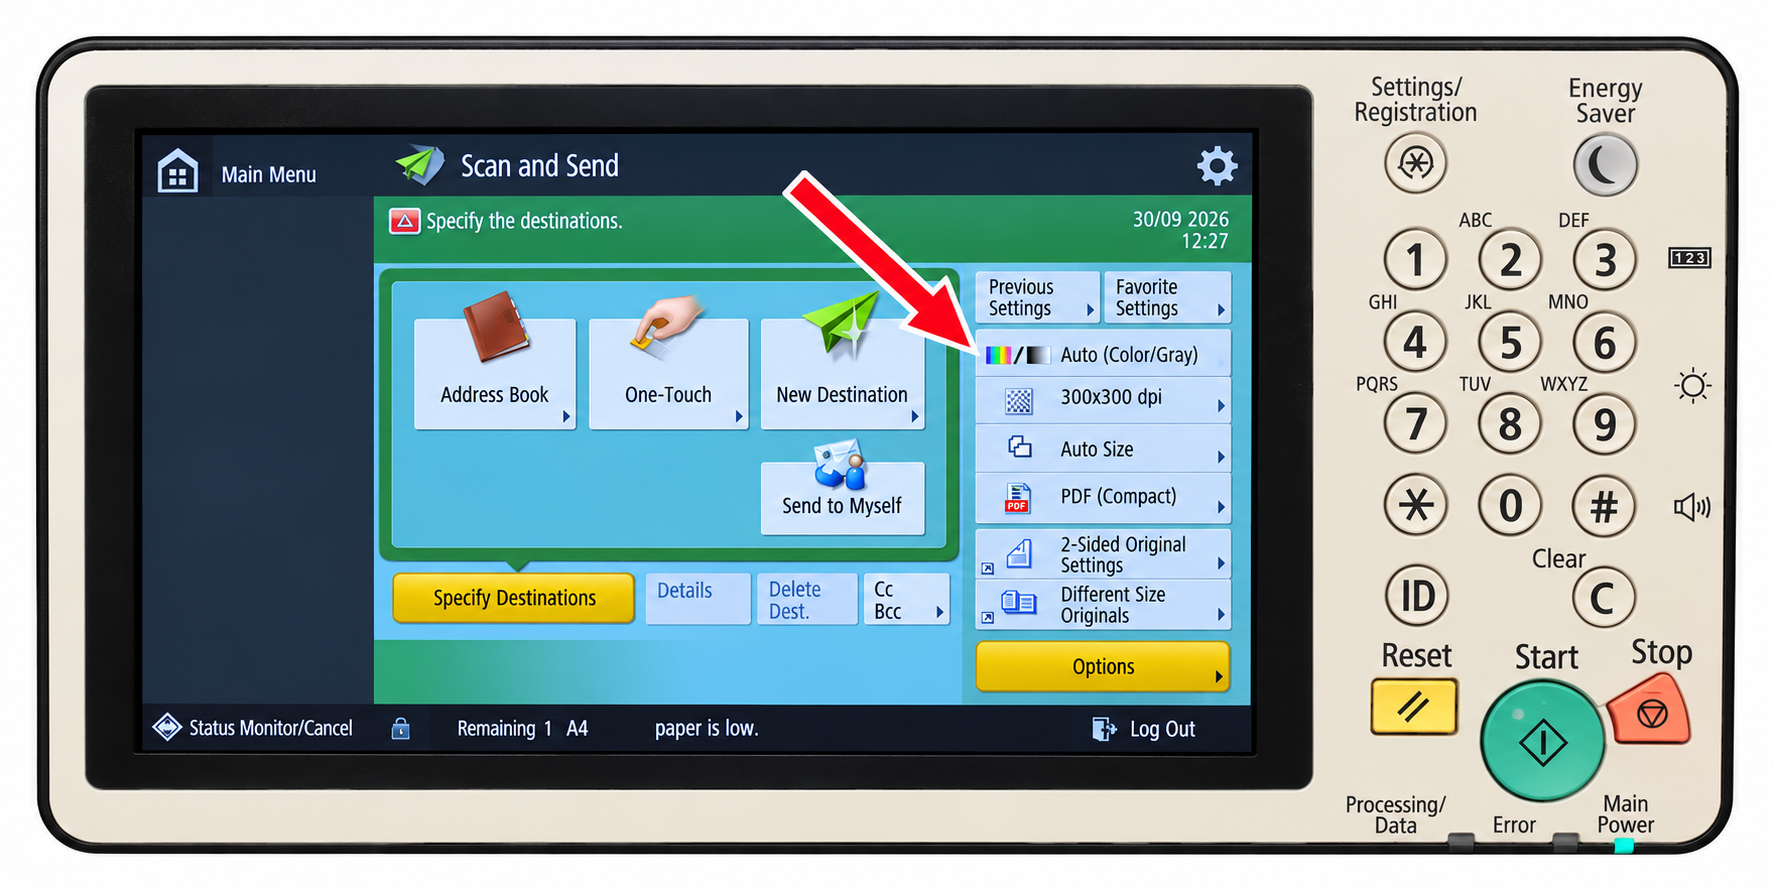
4Open the colour setting
On the Scan and Send page, select Auto (Color/Gray).
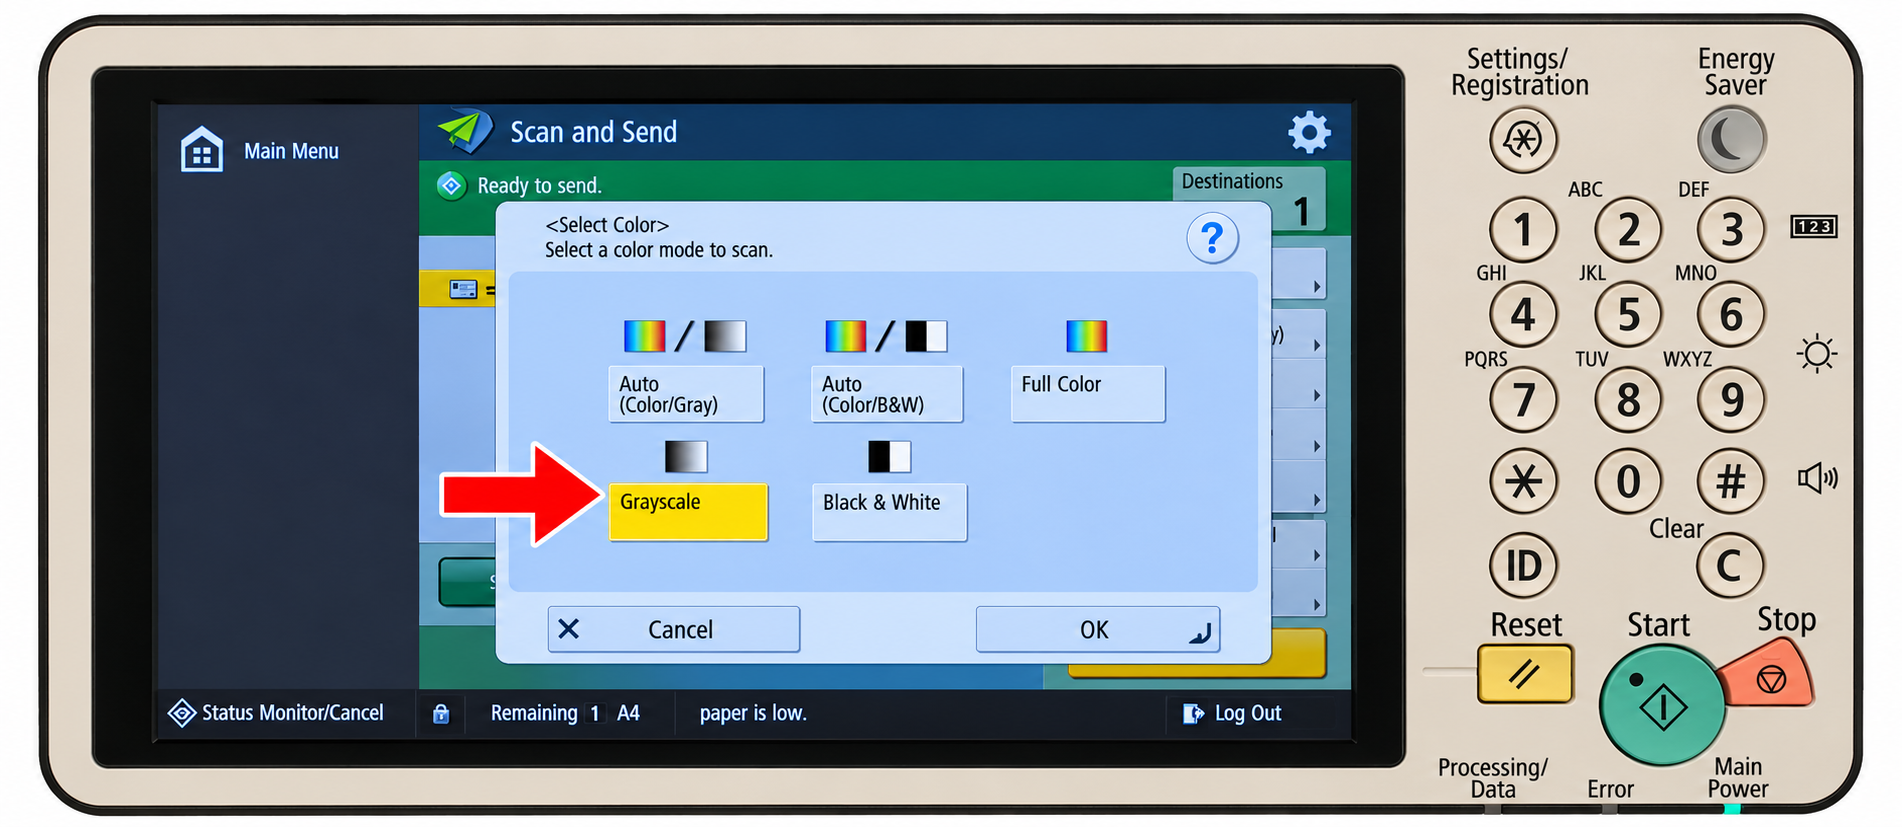
5Choose Grayscale
Select Grayscale, then select OK to return to Scan and Send.
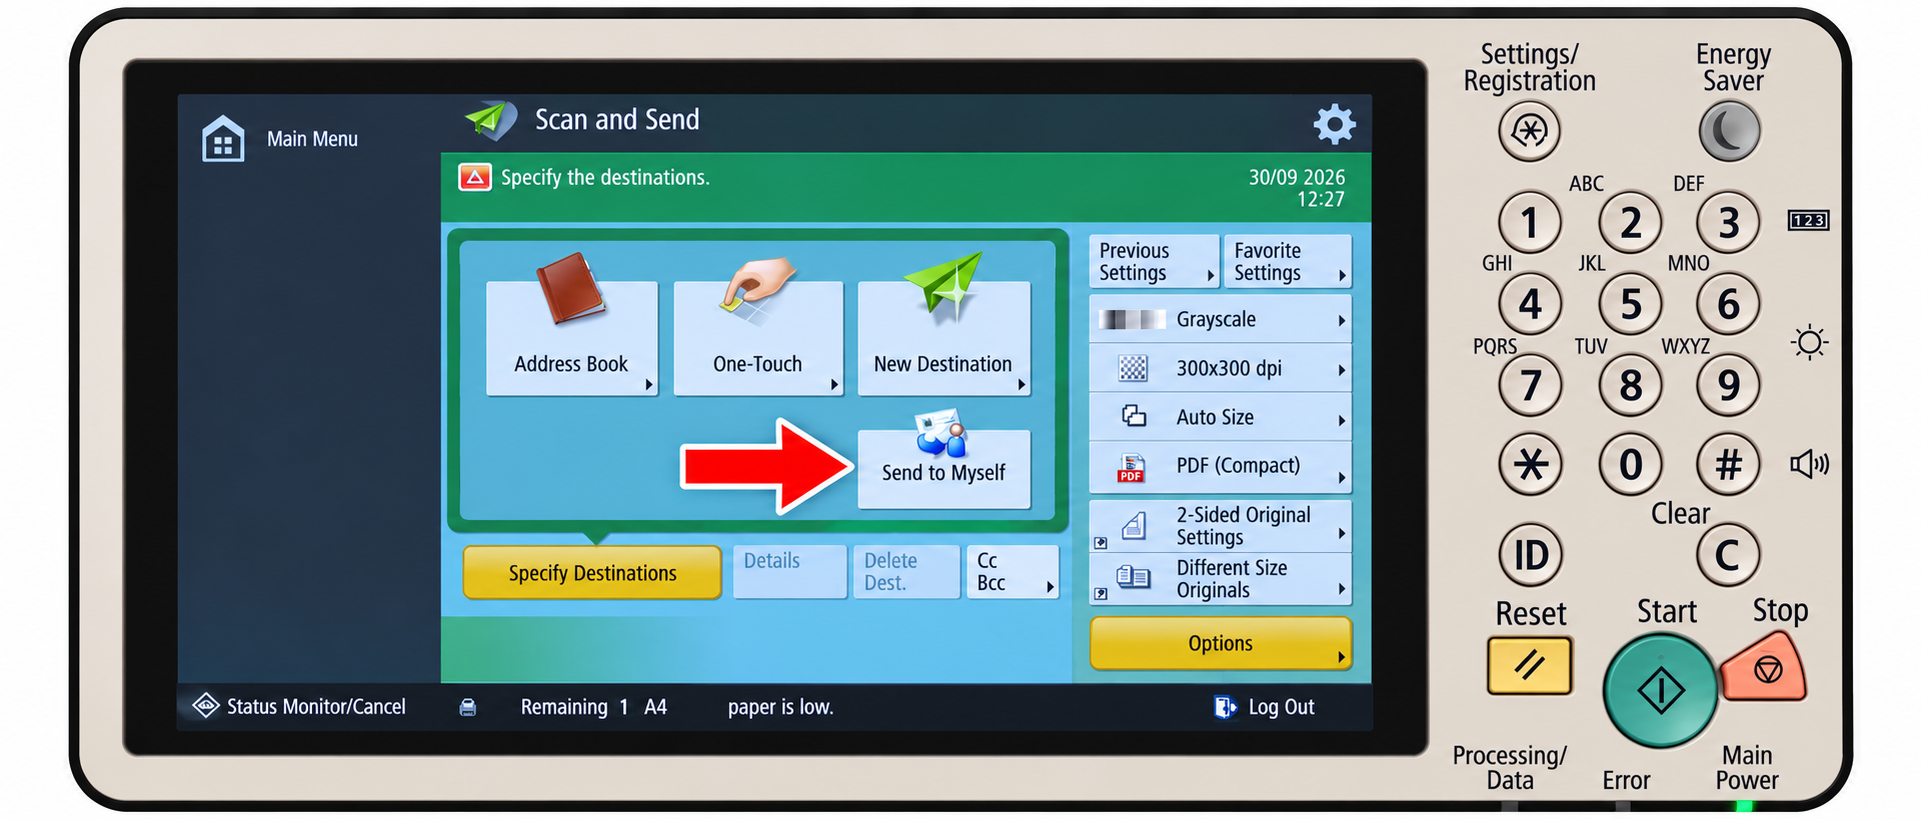
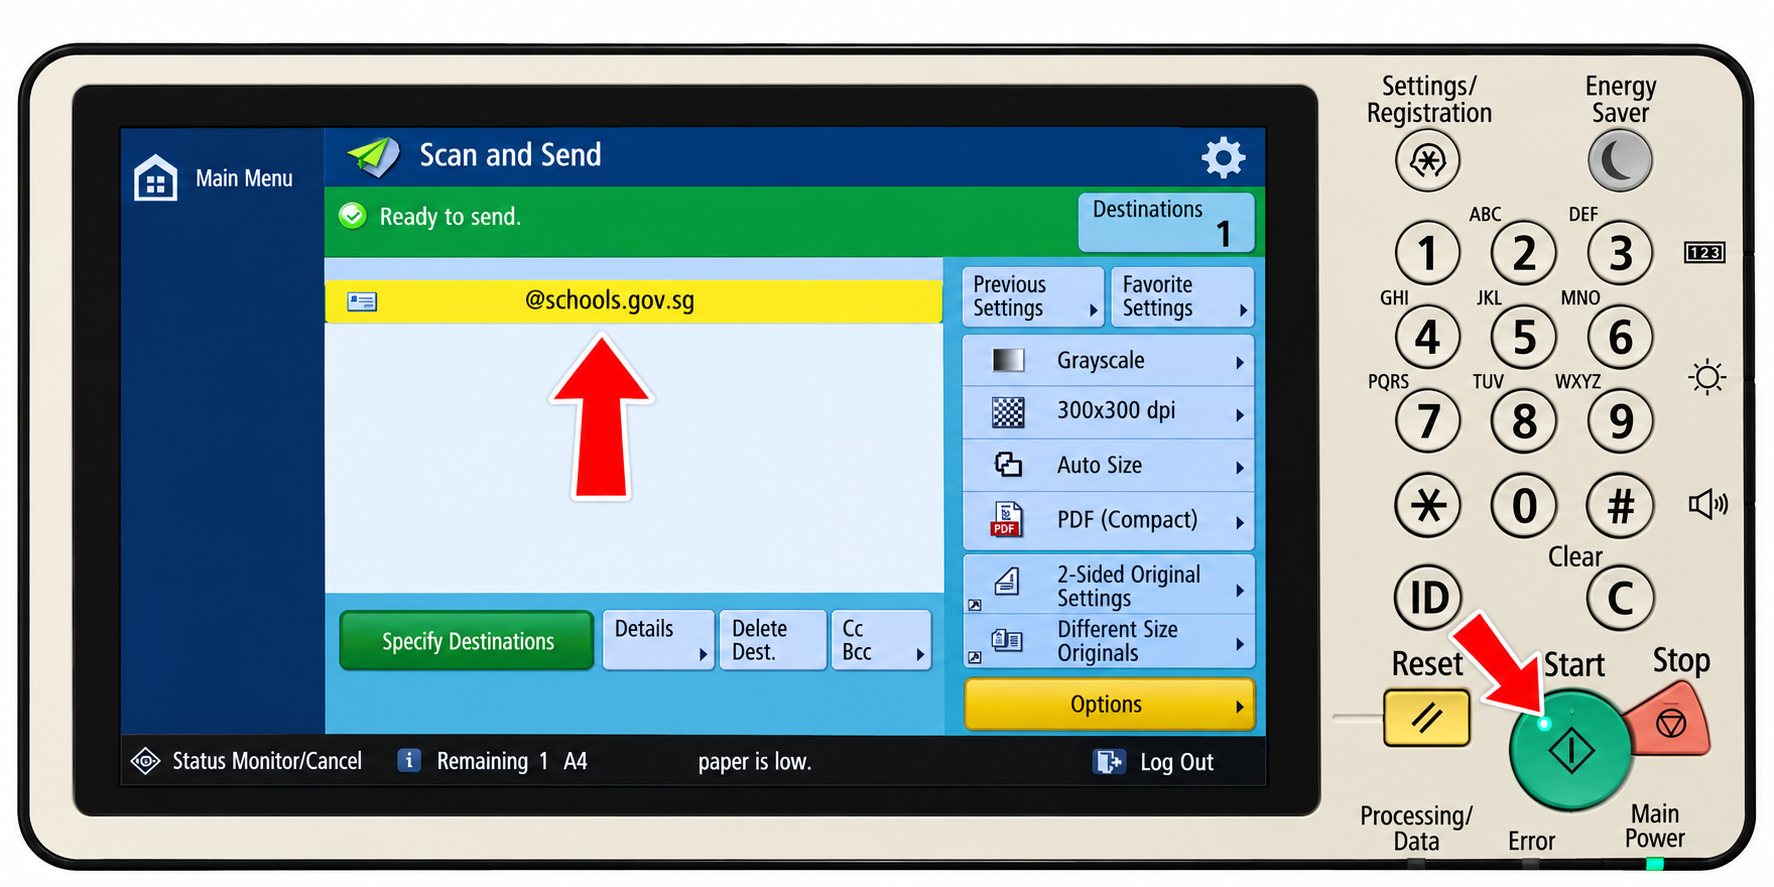
6Send to yourself
Back on Scan and Send, select Send to Myself.
7Select your email and start
Select your email address, then press the physical green Start button.
When the scan arrives in your email, save the PDF files to your computer, then follow the Microsoft Purview instructions below.
THEN CLASSIFY THE PDF FILES
Apply OFFICIAL (CLOSED) - NON-SENSITIVE
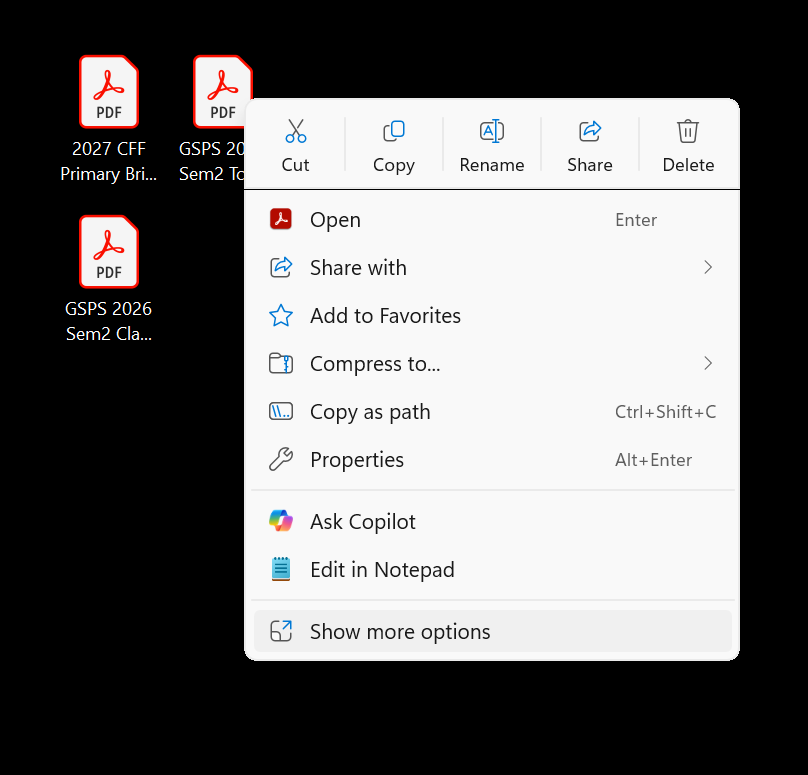
Select all scanner PDF files in Windows Explorer.
Right-click the selected files.
Select Show more options.
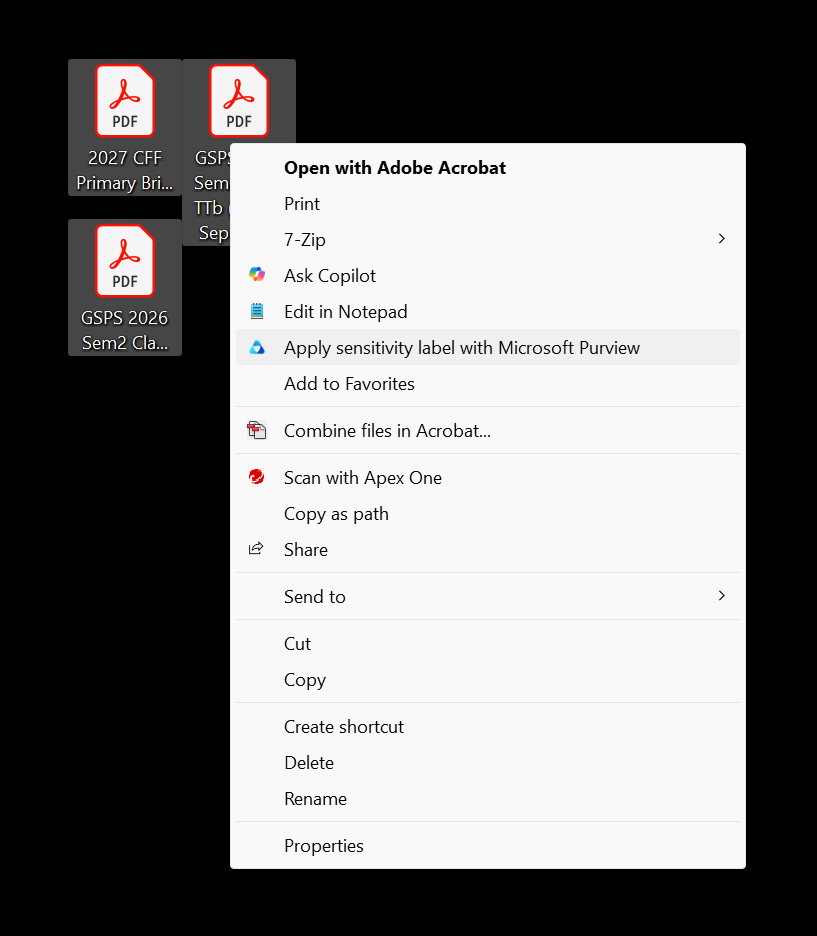
Select Apply sensitivity label with Microsoft Purview.
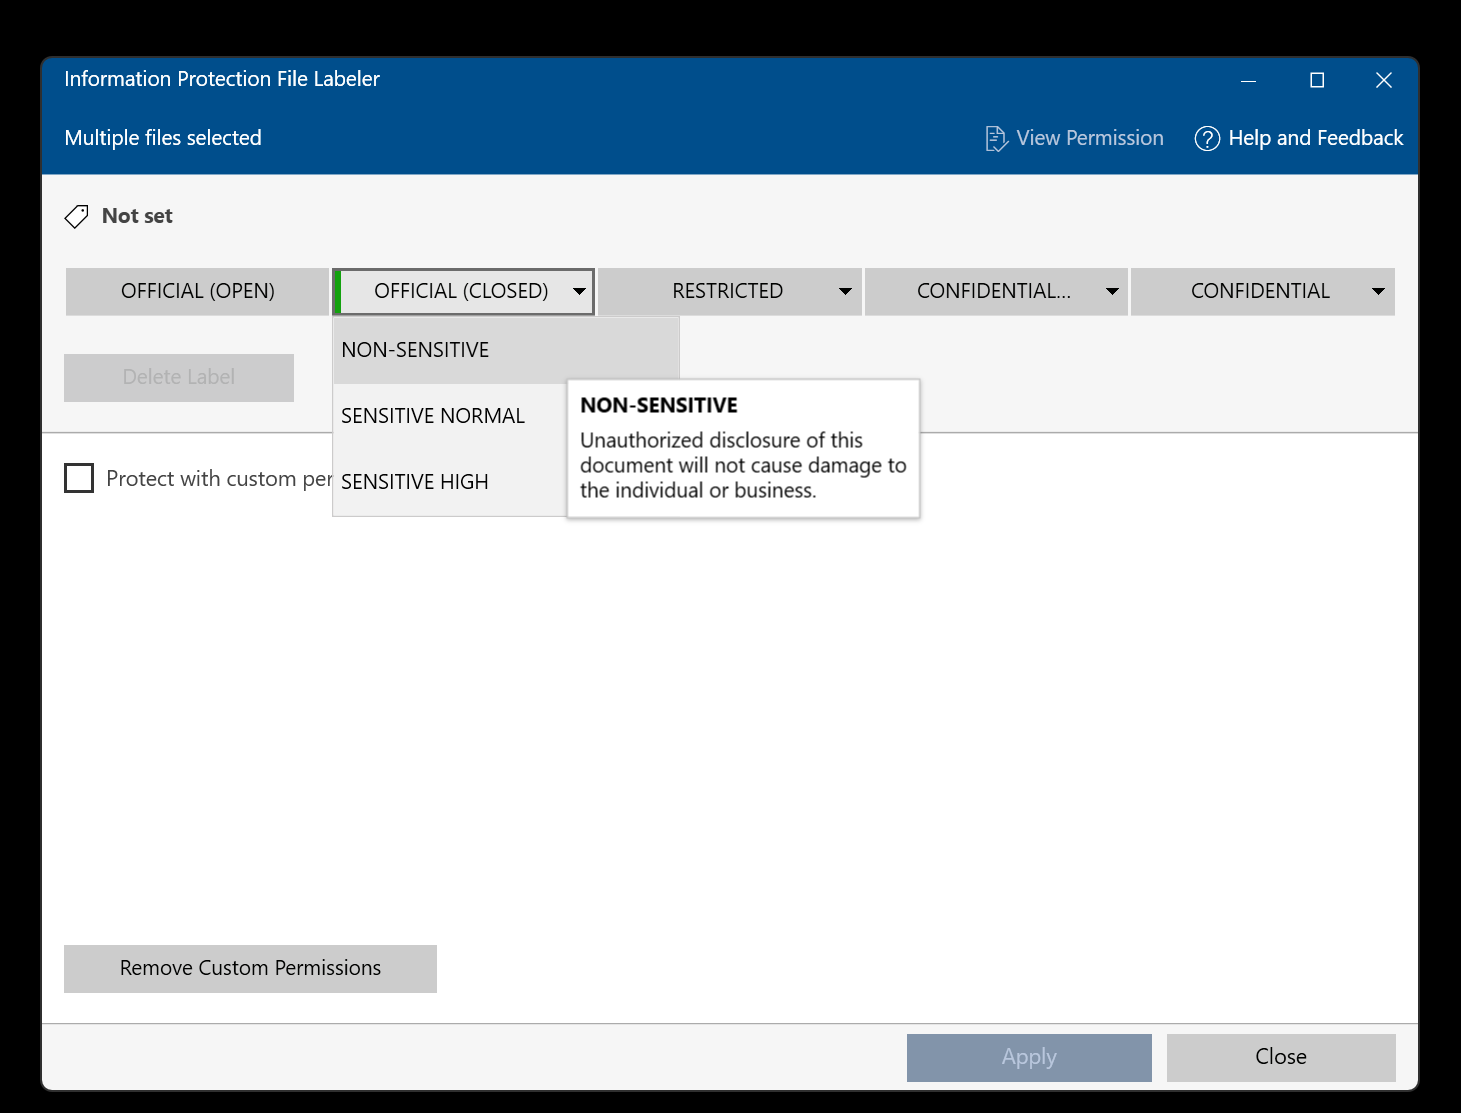
Choose OFFICIAL (CLOSED) → NON-SENSITIVE.
Click any screenshot to enlarge it.
1 · Show more options2 · Apply label3 · NON-SENSITIVE
Load all PDF chunks
Select multiple PDFs in one action. If the Canon created another chunk, use Add more PDFs before processing.
Batch files
0
No files selected
Click to load one or more scanner PDFs.
Local processingPDFs, student responses, roster files and generated outputs are processed in this browser and are not uploaded to GNOME or Cloudflare.
Resume a previous GNOME session
No session loaded
Reading PDFs0%
Preparing batch...
STEP 4A
Check pages & question count
Enter the expected number of questions so teacher review shows the required responses. Set mode, presets, answers and marks in Step 5.
Check scanned pages
Select upside down pages and rotate them 180°. GNOME will read those pages again. Existing teacher corrections are kept.
Load scanned pages first
STEP 4B
Teacher overwrite
Confirm what GNOME read from each script. The teacher is authoritative; any overwrite immediately becomes the value used downstream.
No batch loaded
Class / Index
0
Tick old-form scripts, choose a class, then apply it in one action.
Pages0
Matched0
Review0
Absent0
Cohort: No expected cohort selected
TEACHER-AUTHORITATIVE REVIEW
Select a Class / Index entry to inspect.
Scanned identityClass + Index source evidence
Rendering...
Confirm Class / Index
Machine read-
Roster name-
Handwritten name
Confirm shaded responses
Each group of five keeps the annotated scan crop directly beside the matching teacher overwrite. Select one or more options when the script shows multiple shades; Blank clears the selection. Each click confirms the resulting selection as final; no overall completion button is needed.
Shading sensitivity
LessMore
Detected ovals update live
STEP 5
Answer key & parameters
Set the question count, then enter or paste the answers and marks. The question grid adapts to the selected scan format: up to 45 questions for the GNOME OAS and up to 60 for the legacy form.
Not confirmed
Answer key grid
Paste directly from Excel if useful. Questions beyond the declared count are dimmed and ignored.
Tip: paste answers, answers and marks, or Q#, Ans, Marks. Marks default to 1; use 0 to invalidate an item.
Q#
Ans
Marks
Q#
Ans
Marks
Q#
Ans
Marks
STEP 6
Mark, inspect & download
Run the marking pass, inspect the preliminary cohort and item-level results, then download the complete results pack.
Not marked
Marking scripts
Any material change to cohort, identity, responses, answer key or marks makes the run dirty; simply re-mark.
Ready0%
Waiting to mark
Download results pack
Includes Scripts PDF, Annotated PDF, Result Slips, Analysis.xlsx, Answer Key.xlsx and Session JSON in one ZIP.
Ready0%
Waiting for a completed marking run
PRELIMINARY ANALYSIS
What the marking run is showing
Check these results before downloading the final workbook.
A quick-and-dirty guide to reading the Functional Index (Fi) and Discriminatory Index (Di) in the analysis workbook.
Functional Index (Fi)
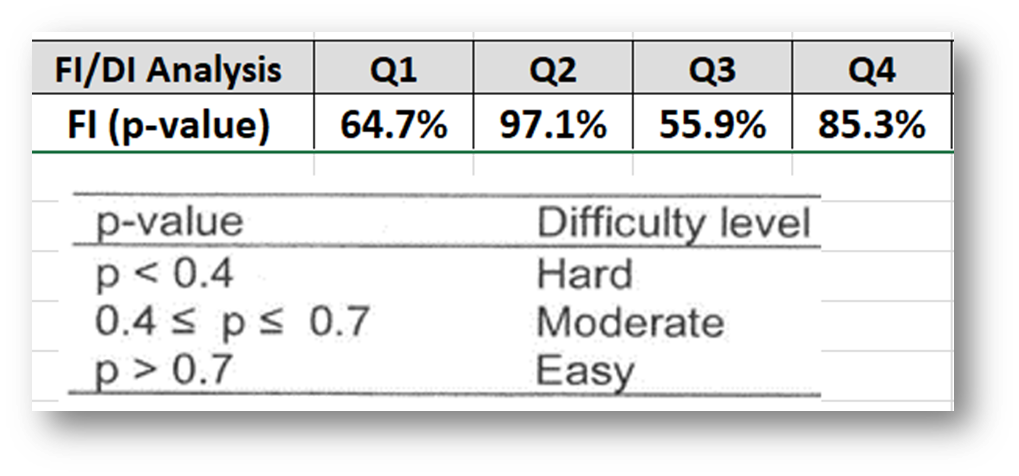
This is simply the proportion of students who gave the correct response.
In this example, about half the student made a mistake for Q3. Most of the students gave the correct answer for Q2, so Q2 is considered to be 'easy' for this group of students.
A well-balanced test should have a good mix of easy, moderate and hard questions.
Discriminatory Index (Di)
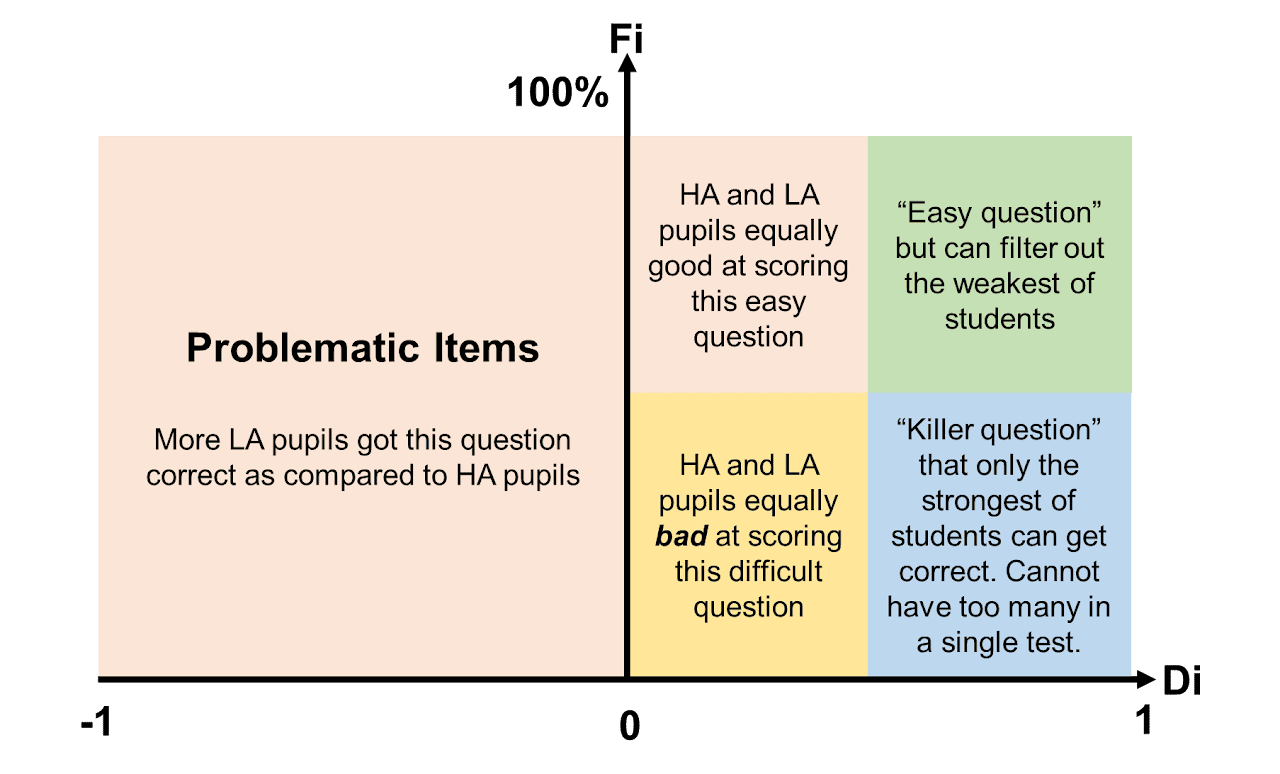
This is a measure of how well the question can distinguish strong vs weak students.
Di is calculated by
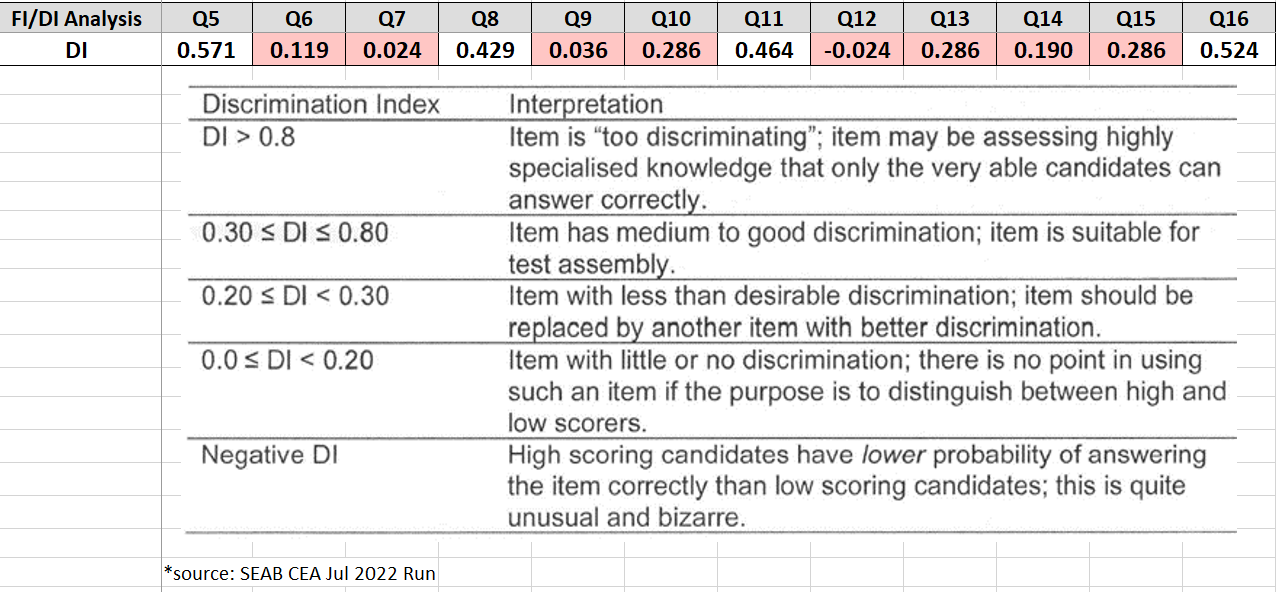
(proportion of high overall scorers getting this question correct) - (proportion of low overall scorers getting this question correct)
For e.g., if ALL the high-scorers got Q1 correct, and ALL the low-scorers got the question wrong, then DI for Q1 = 1 - 0 = 1.
A problematic extreme case can be when ALL the high-scorers got Q2 wrong, and ALL the low-scorers got the question correct, then DI for Q2 = 0 - 1 = negative 1.
Real-world Example
The setters for this test should study if items Q6, Q7, Q9, Q12, Q14 are problematic.
This is meant as a quick-and-dirty guide. If you wish to go more in-depth, you should consider SEAB Certificate in Assessment (CEA) courses.